{{Tekijä}}
{{excerpt words = "100"}} ... Lue lisää
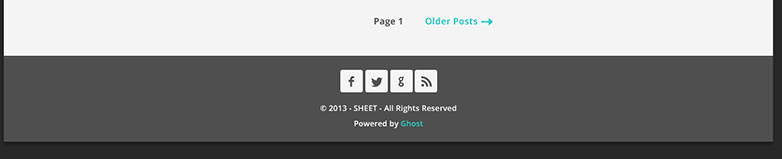
{{{sivunumerointi}}}
{{/jos}} blogging platform Ghost bloggaaminen alusta Ghost on saanut paljon huomiota äskettäin sen vuoksi, että se siirtyi äskettäin beta-ohjelmasta julkiseen julkaisuun (jos et ole vielä kuullut siitä, päätä tänne ja lukea).
Kuten muutkin alustat, Ghost tukee kolmannen osapuolen teemoja. Tässä artikkelissa suunnitellaan yksinkertainen, reagoiva ja sisällöllinen blogi. Sitten koodata se täysin toimiva teema Ghost.
Ghostin oletusteema "Casper" on erittäin puhdasta. He laittavat sisältöä ensin, näyttäen typografian nykyaikaisella värivalikolla, niin että painopiste on kirjallisesti.
Seuraamme tätä ohjetta, joten suunnitteluprosessimme täytyy alkaa ymmärtää, miten Ghost toimii ja mikä on käyttäjän käytettävissä taustaohjelmassa. Neljä keskeistä osa-aluetta, joita pystymme vetämään taustalta, kun suunnittelemme teemaa (lukuun ottamatta artikkeleita / viestejä itsestään), jotka ovat:
Kaikki nämä voidaan asettaa Ghostin Asetukset- välilehdelle. Nämä viittaavat suunnitelmaan selkeään suuntaan jonkinlaisen banneri sivun yläosassa, joka sisältää otsikon, logon ja kuvauksen sekä kansikuvan taustana.
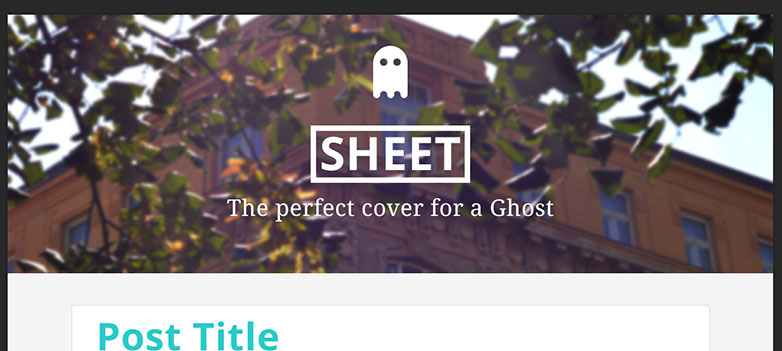
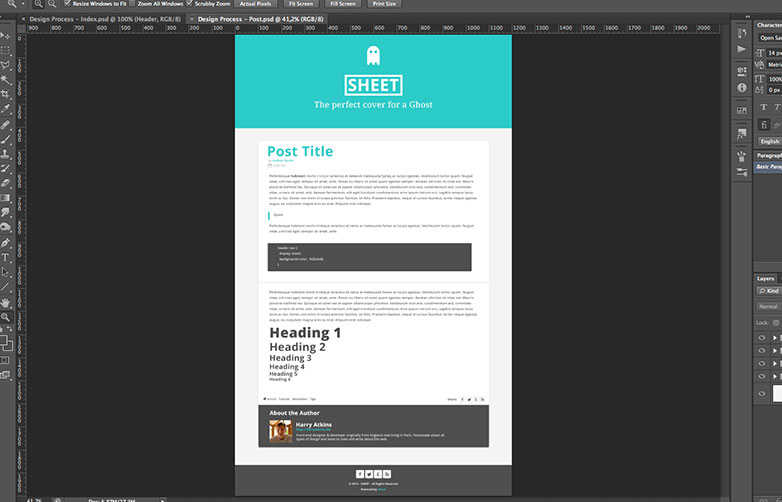
Joten meidän täytyy vain suunnitella 2 sivua, eli kotisivu, joka näyttää kaikki viimeisimmät viestit ja yksittäisen sivun. Koska malli on suhteellisen yksinkertainen, näytän ensin valmiin sivun ja sitten uudelleen yksityiskohdat. Joten tässä on "koti" -sivu, joka näyttää viimeisimmät viestit:

Joten näet värikkäät kohokohdat sekä perus-ja puhdas muotoilu. Käy läpi yksityiskohdat uudelleen. Joten meillä on otsikko, joka sisältää logon (tässä olen tehnyt pienen arkin puku aaveelle), blogin nimen ja kuvauksen.
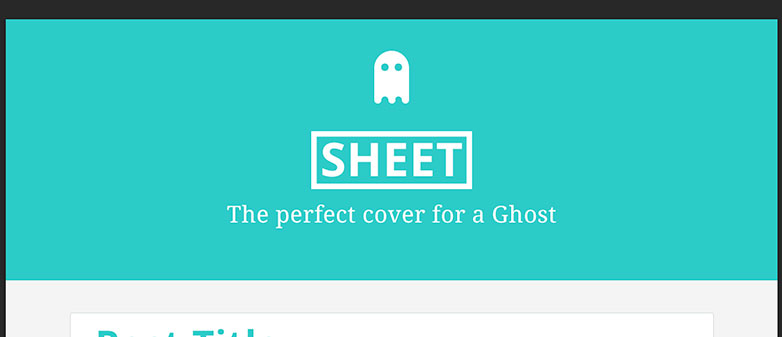
Joten jos käyttäjä valitsee kansikuvan, laita se täysleveyden taustakuvaksi täällä. Jos ei, menemme vankkaan siniseen väriä, joka tulee olemaan korostusväri kuten yllä.
Sitten meillä on joitain sisältöruutuja, joissa näytämme kaikki tiedot jokaisesta viestistä (otsikko, julkaistu päivämäärä, kirjoittaja, tunnisteet) ja ote.
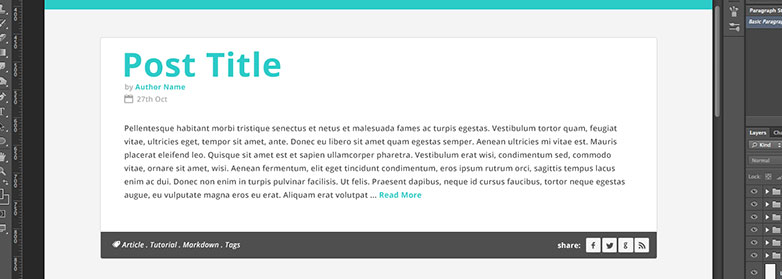
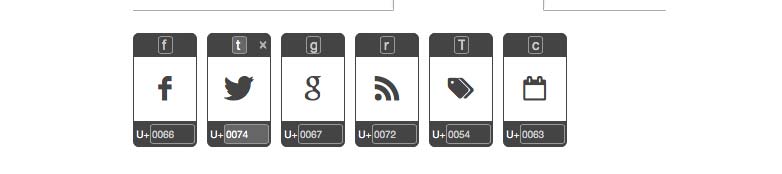
Lopuksi teemme yksinkertaisen sivutunnuksen linkin ja alatunnisteen. Artikkelivälivaiheessa, alatunnisteen ja kaikkialla sivustossa käytämme omalla kuvakkeella tehtyä kuvaketta Fontello ja fontti Avaa Sans Google Web -fontit. Näemme, miten myöhemmin toteutetaan.
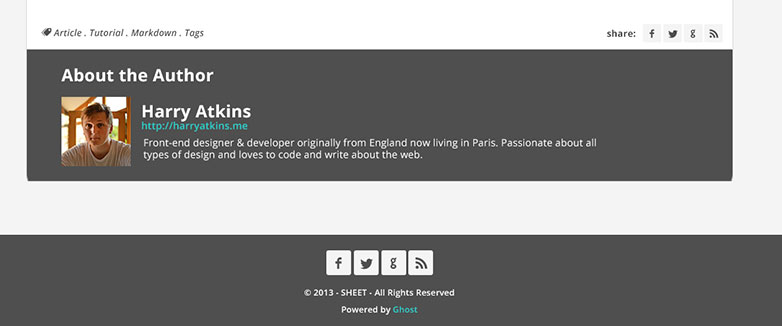
Tämä malli on hyvin samankaltainen kuin kotisivun. Lukuun ottamatta lohkoa, jossa oheistimme ote ennen, nyt venyttää koko korkeus ja näyttää kaiken sisällön. Lisäksi lisäämme kirjoitinlaatikon alareunaan.
Joten kaikki on sama, lukuun ottamatta muutamia inline-tekstin muotoiluja, jotka menemme läpi kehitysvaiheessa. Ja tässä on uusi kirjoitinlaatikko:
Okei, nyt nyt mallia on tarkasteltu (ja tietenkin muokata sitä omien mieltymyksiesi). On aika alkaa kehityksestä. Ensinnäkin, jos et ole jo tehnyt niin, ota toinen ja lue Virallinen Ghost teemojen luomiseen liittyvät asiakirjat. Ne ovat hyvin selkeitä ja ytimekkäitä mitä tarvitaan ja tiedostorakenne ja niin edelleen. Pohjimmiltaan tästä opetusohjelmasta voimme jakaa kehityksen kahteen vaiheeseen. Sisältö ja tyyli. Kuten HTML: n ja CSS: n perussisältö, teemahaastattelu tekee sen näyttävän mallilta.
Aluksi sinun on asennettava Ghost paikallisesti koneellesi. Tämä on suhteellisen helppoa eteenpäin, ja nyt on jopa automaattisia asentimia (kuten Tämä ). Kun se on asennettu ja käynnissä, sinun on löydettävä Ghost-kansio, joka on nimeltään "ghost-version.number" (kirjoitushetkellä "ghost-0.3.2"). Kun olet löytänyt, siirry "sisältöön / teemoihin", niin haluat luoda uuden kansion, jolla on teeman nimi. Joten tässä tapauksessa kutsumme sitä "arkiksi". Sisällä tätä kansiota aiomme tehdä kaksi tiedostoa, jotka ovat välttämättömiä Ghost-teemalle. Se on "index.hbs" ja "post.hbs", jos olet lukenut Ghost -dokumentaation (tai olet käyttänyt Handlebarsia muualla), tunnistat tiedostomuodon .hbs, joten voimme käyttää ns. "Ohjaustangot" : {{}} malliomme.
Tämän jälkeen lisätään toinen tiedosto nimeltään "default.hbs" ja kansioiden rakenne varallisuuksillemme ja osatiedostoille. Seuraa tätä tiedostorakennetta:
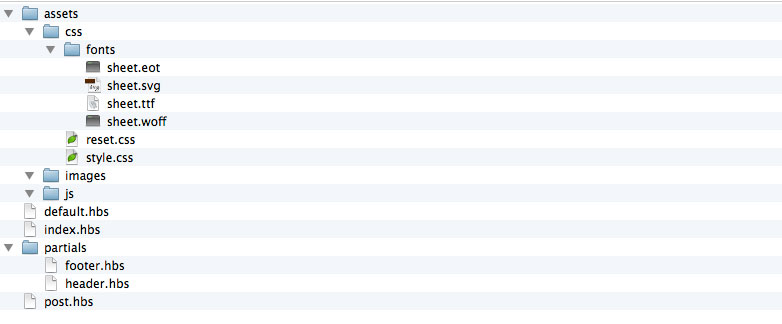
"Assets / css / fonts" -ominaisuudessa sijoitamme kuvakefonttitiedostot @ font-face -versioon. Tätä mallia varten olen valinnut vain 6 kuvaketta: Facebook, Twitter, Google, RSS, Tunnisteet, Kalenteri.
Sen lisäksi, että muut tiedostot ovat melko itsestään selvää. Ota nyt koodi. Tarkastelemme ensin teeman kahdesta olennaisesta tiedostosta.
Mitä tulee malleihin, annan koko tiedoston sisällön ensin, sitten hajotamme tärkeät bitit. Ensinnäkin "index.hbs" -tiedosto:
{{!< default}}{{> header}}{{#foreach posts}}{{Tekijä}}
{{excerpt words = "100"}} ... Lue lisää
{{/ foreach}} {{# if pagination}} {{{sivunumerointi}}} {{/jos}} {{> footer}} So to explain what's happening, the very first line is essential to the theme and tell us that this file will be inserted into the content area into the default file. The second line then inserts our header. Instead of putting it into this file we'll create a partial file later in the 'partials' directory. HBS files are just like HTML files in which you can include normal HTML elements. So the next element in the file is a which will hold all of our main content. Then inside of the repeater we'll put our article element that will contain the post. Inside each there will be a with the title and the meta data of the article (author and publish date). After that the actual excerpt. Then a that has our post's tags (in between an 'if' statement) and the share links, with some span's calling in our icon font. Finally we have some pagination, and we eventually call in the which works like the header. So as you can see it's relatively simple code. Obviously any class or ID names are optional for CSS styling. Next up comes the 'post.hbs' file. Which is mostly similar, but with a few additions and modifications. /">← Go Back {{title}} by {{author}} {{date format='DD MMM YYYY'}} {{content}} {{#if tags}} Tags: {{tags separator=" . "}} {{/if}} Share: {{#if author}} About the Author {{#if author.image}} {{/if}} {{author.name}} {{#if author.website}} {{author.website}} {{/if}} {{author.bio}} {{/if}}{{/post}} {{> footer}} Once again we have the and handlebars. And our element. But this time the wrapping handlebar is Then we call in the (Not excerpt, because this is the individual page we want to show all of the content in the post.) Another difference here is the 'if' statement which is verifying if there's an author for the post. If there is we'll show a box with the author's image, name, URL and bio. All of these elements are editable in the back-end by the user, and will either show up or not depending on whether they exist. 'default.hbs' and the partial files Now we're going to look at the default.hbs file. So if you haven't made it yet, create a new file. In that file we're going to put all the default things that are needed for our page to display correctly in a browser, mainly the doctype and the , and tags. {{ghost_head}} {{{body}}} {{ghost_foot}}
{{!< default}} So to explain what's happening, the very first line is essential to the theme and tell us that this file will be inserted into the content area into the default file. The second line then inserts our header. Instead of putting it into this file we'll create a partial file later in the 'partials' directory. HBS files are just like HTML files in which you can include normal HTML elements. So the next element in the file is a which will hold all of our main content. Then inside of the repeater we'll put our article element that will contain the post. Inside each there will be a with the title and the meta data of the article (author and publish date). After that the actual excerpt. Then a that has our post's tags (in between an 'if' statement) and the share links, with some span's calling in our icon font. Finally we have some pagination, and we eventually call in the which works like the header. So as you can see it's relatively simple code. Obviously any class or ID names are optional for CSS styling. Next up comes the 'post.hbs' file. Which is mostly similar, but with a few additions and modifications. /">← Go Back {{title}} by {{author}} {{date format='DD MMM YYYY'}} {{content}} {{#if tags}} Tags: {{tags separator=" . "}} {{/if}} Share: {{#if author}} About the Author {{#if author.image}} {{/if}} {{author.name}} {{#if author.website}} {{author.website}} {{/if}} {{author.bio}} {{/if}}{{/post}} {{> footer}} Once again we have the and handlebars. And our element. But this time the wrapping handlebar is Then we call in the (Not excerpt, because this is the individual page we want to show all of the content in the post.) Another difference here is the 'if' statement which is verifying if there's an author for the post. If there is we'll show a box with the author's image, name, URL and bio. All of these elements are editable in the back-end by the user, and will either show up or not depending on whether they exist. 'default.hbs' and the partial files Now we're going to look at the default.hbs file. So if you haven't made it yet, create a new file. In that file we're going to put all the default things that are needed for our page to display correctly in a browser, mainly the doctype and the , and tags. {{ghost_head}} {{{body}}} {{ghost_foot}}
{{> header}} So to explain what's happening, the very first line is essential to the theme and tell us that this file will be inserted into the content area into the default file. The second line then inserts our header. Instead of putting it into this file we'll create a partial file later in the 'partials' directory. HBS files are just like HTML files in which you can include normal HTML elements. So the next element in the file is a which will hold all of our main content. Then inside of the repeater we'll put our article element that will contain the post. Inside each there will be a with the title and the meta data of the article (author and publish date). After that the actual excerpt. Then a that has our post's tags (in between an 'if' statement) and the share links, with some span's calling in our icon font. Finally we have some pagination, and we eventually call in the which works like the header. So as you can see it's relatively simple code. Obviously any class or ID names are optional for CSS styling. Next up comes the 'post.hbs' file. Which is mostly similar, but with a few additions and modifications. /">← Go Back {{title}} by {{author}} {{date format='DD MMM YYYY'}} {{content}} {{#if tags}} Tags: {{tags separator=" . "}} {{/if}} Share: {{#if author}} About the Author {{#if author.image}} {{/if}} {{author.name}} {{#if author.website}} {{author.website}} {{/if}} {{author.bio}} {{/if}}{{/post}} {{> footer}} Once again we have the and handlebars. And our element. But this time the wrapping handlebar is Then we call in the (Not excerpt, because this is the individual page we want to show all of the content in the post.) Another difference here is the 'if' statement which is verifying if there's an author for the post. If there is we'll show a box with the author's image, name, URL and bio. All of these elements are editable in the back-end by the user, and will either show up or not depending on whether they exist. 'default.hbs' and the partial files Now we're going to look at the default.hbs file. So if you haven't made it yet, create a new file. In that file we're going to put all the default things that are needed for our page to display correctly in a browser, mainly the doctype and the , and tags. {{ghost_head}} {{{body}}} {{ghost_foot}}
{{/if}} {{author.name}} {{#if author.website}} {{author.website}} {{/if}} {{author.bio}} {{/if}}{{/post}} {{> footer}} Once again we have the and handlebars. And our element. But this time the wrapping handlebar is Then we call in the (Not excerpt, because this is the individual page we want to show all of the content in the post.) Another difference here is the 'if' statement which is verifying if there's an author for the post. If there is we'll show a box with the author's image, name, URL and bio. All of these elements are editable in the back-end by the user, and will either show up or not depending on whether they exist. 'default.hbs' and the partial files Now we're going to look at the default.hbs file. So if you haven't made it yet, create a new file. In that file we're going to put all the default things that are needed for our page to display correctly in a browser, mainly the doctype and the , and tags. {{ghost_head}} {{{body}}} {{ghost_foot}}
{{#foreach posts}} So to explain what's happening, the very first line is essential to the theme and tell us that this file will be inserted into the content area into the default file. The second line then inserts our header. Instead of putting it into this file we'll create a partial file later in the 'partials' directory. HBS files are just like HTML files in which you can include normal HTML elements. So the next element in the file is a which will hold all of our main content. Then inside of the repeater we'll put our article element that will contain the post. Inside each there will be a with the title and the meta data of the article (author and publish date). After that the actual excerpt. Then a that has our post's tags (in between an 'if' statement) and the share links, with some span's calling in our icon font. Finally we have some pagination, and we eventually call in the which works like the header. So as you can see it's relatively simple code. Obviously any class or ID names are optional for CSS styling. Next up comes the 'post.hbs' file. Which is mostly similar, but with a few additions and modifications. /">← Go Back {{title}} by {{author}} {{date format='DD MMM YYYY'}} {{content}} {{#if tags}} Tags: {{tags separator=" . "}} {{/if}} Share: {{#if author}} About the Author {{#if author.image}} {{/if}} {{author.name}} {{#if author.website}} {{author.website}} {{/if}} {{author.bio}} {{/if}}{{/post}} {{> footer}} Once again we have the and handlebars. And our element. But this time the wrapping handlebar is Then we call in the (Not excerpt, because this is the individual page we want to show all of the content in the post.) Another difference here is the 'if' statement which is verifying if there's an author for the post. If there is we'll show a box with the author's image, name, URL and bio. All of these elements are editable in the back-end by the user, and will either show up or not depending on whether they exist. 'default.hbs' and the partial files Now we're going to look at the default.hbs file. So if you haven't made it yet, create a new file. In that file we're going to put all the default things that are needed for our page to display correctly in a browser, mainly the doctype and the , and tags. {{ghost_head}} {{{body}}} {{ghost_foot}}
{{/if}} {{author.name}} {{#if author.website}} {{author.website}} {{/if}} {{author.bio}} {{/if}}{{/post}} {{> footer}} Once again we have the and handlebars. And our element. But this time the wrapping handlebar is Then we call in the (Not excerpt, because this is the individual page we want to show all of the content in the post.) Another difference here is the 'if' statement which is verifying if there's an author for the post. If there is we'll show a box with the author's image, name, URL and bio. All of these elements are editable in the back-end by the user, and will either show up or not depending on whether they exist. 'default.hbs' and the partial files Now we're going to look at the default.hbs file. So if you haven't made it yet, create a new file. In that file we're going to put all the default things that are needed for our page to display correctly in a browser, mainly the doctype and the , and tags. {{ghost_head}} {{{body}}} {{ghost_foot}}
{{/if}} {{author.name}} {{#if author.website}} {{author.website}} {{/if}} {{author.bio}} {{/if}}{{/post}} {{> footer}} Once again we have the and handlebars. And our element. But this time the wrapping handlebar is Then we call in the (Not excerpt, because this is the individual page we want to show all of the content in the post.) Another difference here is the 'if' statement which is verifying if there's an author for the post. If there is we'll show a box with the author's image, name, URL and bio. All of these elements are editable in the back-end by the user, and will either show up or not depending on whether they exist. 'default.hbs' and the partial files Now we're going to look at the default.hbs file. So if you haven't made it yet, create a new file. In that file we're going to put all the default things that are needed for our page to display correctly in a browser, mainly the doctype and the , and tags. {{ghost_head}} {{{body}}} {{ghost_foot}}
{{> footer}} So to explain what's happening, the very first line is essential to the theme and tell us that this file will be inserted into the content area into the default file. The second line then inserts our header. Instead of putting it into this file we'll create a partial file later in the 'partials' directory. HBS files are just like HTML files in which you can include normal HTML elements. So the next element in the file is a which will hold all of our main content. Then inside of the repeater we'll put our article element that will contain the post. Inside each there will be a with the title and the meta data of the article (author and publish date). After that the actual excerpt. Then a that has our post's tags (in between an 'if' statement) and the share links, with some span's calling in our icon font. Finally we have some pagination, and we eventually call in the which works like the header. So as you can see it's relatively simple code. Obviously any class or ID names are optional for CSS styling. Next up comes the 'post.hbs' file. Which is mostly similar, but with a few additions and modifications. /">← Go Back {{title}} by {{author}} {{date format='DD MMM YYYY'}} {{content}} {{#if tags}} Tags: {{tags separator=" . "}} {{/if}} Share: {{#if author}} About the Author {{#if author.image}} {{/if}} {{author.name}} {{#if author.website}} {{author.website}} {{/if}} {{author.bio}} {{/if}}{{/post}} {{> footer}} Once again we have the and handlebars. And our element. But this time the wrapping handlebar is Then we call in the (Not excerpt, because this is the individual page we want to show all of the content in the post.) Another difference here is the 'if' statement which is verifying if there's an author for the post. If there is we'll show a box with the author's image, name, URL and bio. All of these elements are editable in the back-end by the user, and will either show up or not depending on whether they exist. 'default.hbs' and the partial files Now we're going to look at the default.hbs file. So if you haven't made it yet, create a new file. In that file we're going to put all the default things that are needed for our page to display correctly in a browser, mainly the doctype and the , and tags. {{ghost_head}} {{{body}}} {{ghost_foot}}
So to explain what's happening, the very first line is essential to the theme and tell us that this file will be inserted into the content area into the default file. The second line then inserts our header. Instead of putting it into this file we'll create a partial file later in the 'partials' directory. HBS files are just like HTML files in which you can include normal HTML elements. So the next element in the file is a which will hold all of our main content. Then inside of the repeater we'll put our article element that will contain the post. Inside each there will be a with the title and the meta data of the article (author and publish date). After that the actual excerpt. Then a that has our post's tags (in between an 'if' statement) and the share links, with some span's calling in our icon font. Finally we have some pagination, and we eventually call in the which works like the header. So as you can see it's relatively simple code. Obviously any class or ID names are optional for CSS styling. Next up comes the 'post.hbs' file. Which is mostly similar, but with a few additions and modifications. /">← Go Back {{title}} by {{author}} {{date format='DD MMM YYYY'}} {{content}} {{#if tags}} Tags: {{tags separator=" . "}} {{/if}} Share: {{#if author}} About the Author {{#if author.image}} {{/if}} {{author.name}} {{#if author.website}} {{author.website}} {{/if}} {{author.bio}} {{/if}}{{/post}} {{> footer}} Once again we have the and handlebars. And our element. But this time the wrapping handlebar is Then we call in the (Not excerpt, because this is the individual page we want to show all of the content in the post.) Another difference here is the 'if' statement which is verifying if there's an author for the post. If there is we'll show a box with the author's image, name, URL and bio. All of these elements are editable in the back-end by the user, and will either show up or not depending on whether they exist. 'default.hbs' and the partial files Now we're going to look at the default.hbs file. So if you haven't made it yet, create a new file. In that file we're going to put all the default things that are needed for our page to display correctly in a browser, mainly the doctype and the , and tags. {{ghost_head}} {{{body}}} {{ghost_foot}}
{{!< default}}{{> header}}{{#post}}{{{url}}}">{{title}} by {{author}} {{date format='DD MMM YYYY'}} {{content}} {{#if tags}} Tags: {{tags separator=" . "}} {{/if}} Share: {{#if author}} About the Author {{#if author.image}} {{/if}} {{author.name}} {{#if author.website}} {{author.website}} {{/if}} {{author.bio}} {{/if}}{{/post}} {{> footer}} Once again we have the and handlebars. And our element. But this time the wrapping handlebar is Then we call in the (Not excerpt, because this is the individual page we want to show all of the content in the post.) Another difference here is the 'if' statement which is verifying if there's an author for the post. If there is we'll show a box with the author's image, name, URL and bio. All of these elements are editable in the back-end by the user, and will either show up or not depending on whether they exist. 'default.hbs' and the partial files Now we're going to look at the default.hbs file. So if you haven't made it yet, create a new file. In that file we're going to put all the default things that are needed for our page to display correctly in a browser, mainly the doctype and the , and tags. {{ghost_head}} {{{body}}} {{ghost_foot}}
So to explain what's happening, the very first line is essential to the theme and tell us that this file will be inserted into the content area into the default file. The second line then inserts our header. Instead of putting it into this file we'll create a partial file later in the 'partials' directory. HBS files are just like HTML files in which you can include normal HTML elements. So the next element in the file is a which will hold all of our main content. Then inside of the repeater we'll put our article element that will contain the post. Inside each there will be a with the title and the meta data of the article (author and publish date). After that the actual excerpt. Then a that has our post's tags (in between an 'if' statement) and the share links, with some span's calling in our icon font. Finally we have some pagination, and we eventually call in the which works like the header. So as you can see it's relatively simple code. Obviously any class or ID names are optional for CSS styling. Next up comes the 'post.hbs' file. Which is mostly similar, but with a few additions and modifications. /">← Go Back {{title}} by {{author}} {{date format='DD MMM YYYY'}} {{content}} {{#if tags}} Tags: {{tags separator=" . "}} {{/if}} Share: {{#if author}} About the Author {{#if author.image}}
So to explain what's happening, the very first line is essential to the theme and tell us that this file will be inserted into the content area into the default file. The second line then inserts our header. Instead of putting it into this file we'll create a partial file later in the 'partials' directory. HBS files are just like HTML files in which you can include normal HTML elements. So the next element in the file is a which will hold all of our main content. Then inside of the repeater we'll put our article element that will contain the post. Inside each there will be a with the title and the meta data of the article (author and publish date). After that the actual excerpt. Then a that has our post's tags (in between an 'if' statement) and the share links, with some span's calling in our icon font. Finally we have some pagination, and we eventually call in the which works like the header. So as you can see it's relatively simple code. Obviously any class or ID names are optional for CSS styling. Next up comes the 'post.hbs' file. Which is mostly similar, but with a few additions and modifications. /">← Go Back {{title}} by {{author}} {{date format='DD MMM YYYY'}} {{content}} {{#if tags}} Tags: {{tags separator=" . "}} {{/if}} Share: {{#if author}} About the Author {{#if author.image}}
So to explain what's happening, the very first line is essential to the theme and tell us that this file will be inserted into the content area into the default file. The second line then inserts our header. Instead of putting it into this file we'll create a partial file later in the 'partials' directory. HBS files are just like HTML files in which you can include normal HTML elements. So the next element in the file is a which will hold all of our main content. Then inside of the repeater we'll put our article element that will contain the post. Inside each there will be a with the title and the meta data of the article (author and publish date). After that the actual excerpt. Then a that has our post's tags (in between an 'if' statement) and the share links, with some span's calling in our icon font. Finally we have some pagination, and we eventually call in the which works like the header. So as you can see it's relatively simple code. Obviously any class or ID names are optional for CSS styling. Next up comes the 'post.hbs' file. Which is mostly similar, but with a few additions and modifications. /">← Go Back {{title}} by {{author}} {{date format='DD MMM YYYY'}} {{content}} {{#if tags}} Tags: {{tags separator=" . "}} {{/if}} Share: {{#if author}} About the Author {{#if author.image}}So to explain what's happening, the very first line is essential to the theme and tell us that this file will be inserted into the content area into the default file. The second line then inserts our header. Instead of putting it into this file we'll create a partial file later in the 'partials' directory. HBS files are just like HTML files in which you can include normal HTML elements. So the next element in the file is a which will hold all of our main content. Then inside of the repeater we'll put our article element that will contain the post. Inside each there will be a with the title and the meta data of the article (author and publish date). After that the actual excerpt. Then a that has our post's tags (in between an 'if' statement) and the share links, with some span's calling in our icon font. Finally we have some pagination, and we eventually call in the which works like the header. So as you can see it's relatively simple code. Obviously any class or ID names are optional for CSS styling. Next up comes the 'post.hbs' file. Which is mostly similar, but with a few additions and modifications. /">← Go Back {{title}} by {{author}} {{date format='DD MMM YYYY'}} {{content}} {{#if tags}} Tags: {{tags separator=" . "}} {{/if}} Share: {{#if author}} About the Author {{#if author.image}}So to explain what's happening, the very first line is essential to the theme and tell us that this file will be inserted into the content area into the default file. The second line then inserts our header. Instead of putting it into this file we'll create a partial file later in the 'partials' directory. HBS files are just like HTML files in which you can include normal HTML elements. So the next element in the file is a which will hold all of our main content. Then inside of the repeater we'll put our article element that will contain the post. Inside each there will be a with the title and the meta data of the article (author and publish date). After that the actual excerpt. Then a that has our post's tags (in between an 'if' statement) and the share links, with some span's calling in our icon font. Finally we have some pagination, and we eventually call in the which works like the header. So as you can see it's relatively simple code. Obviously any class or ID names are optional for CSS styling. Next up comes the 'post.hbs' file. Which is mostly similar, but with a few additions and modifications. /">← Go Back {{title}} by {{author}} {{date format='DD MMM YYYY'}} {{content}} {{#if tags}} Tags: {{tags separator=" . "}} {{/if}} Share: {{#if author}} About the Author {{#if author.image}}So to explain what's happening, the very first line is essential to the theme and tell us that this file will be inserted into the content area into the default file. The second line then inserts our header. Instead of putting it into this file we'll create a partial file later in the 'partials' directory. HBS files are just like HTML files in which you can include normal HTML elements. So the next element in the file is a which will hold all of our main content. Then inside of the repeater we'll put our article element that will contain the post. Inside each there will be a with the title and the meta data of the article (author and publish date). After that the actual excerpt. Then a that has our post's tags (in between an 'if' statement) and the share links, with some span's calling in our icon font. Finally we have some pagination, and we eventually call in the which works like the header. So as you can see it's relatively simple code. Obviously any class or ID names are optional for CSS styling. Next up comes the 'post.hbs' file. Which is mostly similar, but with a few additions and modifications. /">← Go Back {{title}} by {{author}} {{date format='DD MMM YYYY'}} {{content}} {{#if tags}} Tags: {{tags separator=" . "}} {{/if}} Share: {{#if author}} About the Author {{#if author.image}}So to explain what's happening, the very first line is essential to the theme and tell us that this file will be inserted into the content area into the default file. The second line then inserts our header. Instead of putting it into this file we'll create a partial file later in the 'partials' directory. HBS files are just like HTML files in which you can include normal HTML elements. So the next element in the file is a which will hold all of our main content. Then inside of the repeater we'll put our article element that will contain the post. Inside each there will be a with the title and the meta data of the article (author and publish date). After that the actual excerpt. Then a that has our post's tags (in between an 'if' statement) and the share links, with some span's calling in our icon font. Finally we have some pagination, and we eventually call in the which works like the header. So as you can see it's relatively simple code. Obviously any class or ID names are optional for CSS styling. Next up comes the 'post.hbs' file. Which is mostly similar, but with a few additions and modifications. /">← Go Back {{title}} by {{author}} {{date format='DD MMM YYYY'}} {{content}} {{#if tags}} Tags: {{tags separator=" . "}} {{/if}} Share: {{#if author}} About the Author {{#if author.image}}